The Best Saints Row Cars And Vehicles
The general rule of thumb is that the absolute best Saints Row cars are the vehicles you get as mission rewards late in the campaign. You can compare the full roster of cars, aircraft, and boats below to the Saints Row mission list to see for yourself when you can unlock them. We will be spoiling them for you here, so proceed with caution.
Fastest Saints Row cars and vehicles list
Even though mission rewards generally give you the best vehicles, plenty of cars out there deserve a mention that you can pick up at any time. Some require you to find one solitary vehicle hidden away in the Saints Row map, but many roam around the streets of Santo Ileso. Since you can only store so many cars, roughly 40 if you don’t count the unlockable vehicles, you may need to be choosy. Here are the five best regular Saints Row cars:
Attrazione
The Attrazione is by far the fastest sports car in Saints Row and boasts some of the best performance stats if you upgrade it. With its signature ability, it can go even faster, but you need to be somewhat careful as its durability is reasonably low. You can find one in Marina West’s School of Art and Design car park.
Gibraltar
While not the fastest car, it does sport some decent speed for its size, good durability, and high performance. As a result, it’s a particular favourite of the Marshalls, one of the three main rival factions, but you can also find regular versions anywhere in Santo Ileso.
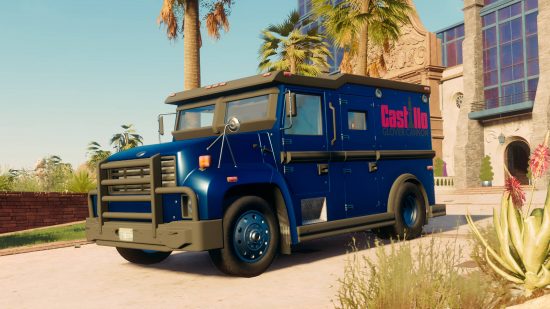
Titan
If you somehow manage to steal one of these money vans, which show on your in-game map as a money bag icon, you’ll have a surprisingly speedy, tough van that can plough through Santo Ileso, smashing everything in its way. However, it does suffer a bit on performance by default, so you may need to take one for a test drive to get used to its handling.
Galahad
It suffers a bit in the durability department, but the Galahad makes up for this downside with its sheer speed, handling, and striking ‘80s synth chassis. In addition, it’s relatively easy to find one just about anywhere.
Skirmish
If you can’t afford off-road kits for the better cars, the Skirmish comes with dirt tires by default while also giving you decent speed and performance for a pick-up truck. Just try not to crash into rocks or bridges, as it can be a little flimsy. These big vehicles are common anywhere, but more so in desert areas.
All Saints Row vehicles
There’s an automobile suitable for any mission, from speedy sports cars to humble hatchbacks. While only a select few are ideal for quick getaways or shoving pesky gang members out of your way, many share similar signature abilities with the same unlock conditions. However, do note that you can’t use the Kenshin K to get the true boosting power of the Attrazione as you must be in the right car to access its ability at the garage.
To equip abilities after you unlock them, head to the garage and select the customise option on your stored car. From here, you can toggle the signature ability on and off.
Finally, there are some cars that you can only unlock by gathering the Saints Row lost wheels. Once you have all five of one type, you’ll get the car. Here is a list of all of the Saints Row vehicles:
Cars and bikes
Adversary (Tank)
Location – appears at Police Notoriety level 5. Tank gun – delivers a high-calibre punch. No challenges.
Ant
Signature ability – Super Air Control: more flips, more fun. Challenge – double backflip twice.
Attrazione
Location – the School of Art and Design car park in Marina West. Signature ability – Infinite Boost: a full nitrous burn instantly refills nitrous. Avoid collisions to sustain boost. Challenge – perform three Nitrous boosts.
Bowelrod
Location – complete the mission ‘Unto the Breach’. Signature ability – Bowelroad Roar: fear the roar of the mighty Bowelrod (does damage to all nearby enemies). Challenge – completed during the mission.
Bucket
Signature ability – Infinite Boost: a full nitrous burn instantly refills nitrous. Avoid collisions to sustain boost. Challenge – perform three Nitrous boosts.
Buffalo
Signature ability – Crab Steering: makes parallel parking and changing lanes a breeze. Challenge – sideswipe eight enemy vehicles.
Chalupacabra
Signature ability – Crab Steering: makes parallel parking and changing lanes a breeze. Challenge – sideswipe eight enemy vehicles.
Cheetah
Signature ability – Air Boost: now you’re flying with nitrous! Challenge – 360 spin three times.
Compton
Signature ability – Jump: hop and skip over rush-hour traffic. Challenge – barrel roll three times.
Courser
Location – by the hydroelectric dam in Rojas Desert South, close to the alien shooting gallery. Signature ability – Super Air Control: more flips, more fun. Challenge – double backflip twice.
Crisis
Signature ability – Crab Steering: makes parallel parking and changing lanes a breeze. Challenge – sideswipe eight enemy vehicles.
Dreadnought
Signature ability – Ejector Seats: perfect for thrill seekers and spies. Challenge – car to wingsuit once.
Dustrider
Location – complete the Castle Kraken Criminal Venture. Signature ability – Ball & Chain: leave destruction in your wake. Challenge – 100 towing payload smashes.
Eiswolf
Signature ability – Jump: hop and skip over rush-hour traffic. Challenge – barrel roll three times.
Emu
Signature ability – Jump: hop and skip over rush-hour traffic. Challenge – barrel roll three times.
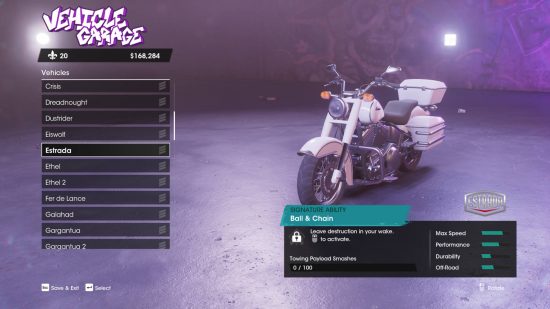
Estrada
Signature ability – Ball & Chain: leave destruction in your wake. Challenge – 100 towing payload smashes.
Ethel
Signature ability – Crab Steering: makes parallel parking and changing lanes a breeze. Challenge – sideswipe eight enemy vehicles.
Fer de Lance
Location – outside the house south of Woodbush Country Club in Monte Lista. Signature ability – Jump: hop and skip over rush-hour traffic. Challenge – barrel roll three times.
Frying Dutchman
Location – collect all five Lost Wheels in Rojas Desert North. Signature ability – Ball & Chain: leave destruction in your wake. Challenge – 100 towing payload smashes.
Galahad
Signature ability – Air Boost: now you’re flying with nitrous! Challenge – 360 spin three times.
Gargantua
Location – south of Ringers clothing store in Rojas Desert South. Signature ability – Jump: hop and skip over rush-hour traffic. Challenge – barrel roll three times.
Gentry
Signature ability – Crab Steering: makes parallel parking and changing lanes a breeze. Challenge – sideswipe eight enemy vehicles.
Gibraltar
Signature ability – Crab Steering: makes parallel parking and changing lanes a breeze. Challenge – sideswipe eight enemy vehicles.
Grandad
Signature ability – Kneecappers: shreds tires and ligaments. Challenge – get a near-miss streak of eight vehicles.
Greenscaper
Signature ability – Kneecappers: shreds tires and ligaments. Challenge – get a near-miss streak of eight vehicles.
Hammerhead
Signature ability – Kneecappers: shreds tires and ligaments. Challenge – get a near-miss streak of eight vehicles.
Heavyweight
Location – find all five Lost wheels for Bones of Kavanagh Country. Signature ability – Jump: hop and skip over rush-hour traffic. Challenge – barrel roll three times.
Hollywood
Signature ability – Infinite Boost: a full nitrous burn instantly refills nitrous. Avoid collisions to sustain boost. Challenge – perform three Nitrous boosts.
Kenshin K
Signature ability – Infinite Boost: a full nitrous burn instantly refills nitrous. Avoid collisions to sustain boost. Challenge – perform three Nitrous boosts.
Kick
Signature ability – Kneecappers: shreds tires and ligaments. Challenge – get a near-miss streak of eight vehicles.
Landbarge
Signature ability – Kneecappers: shreds tires and ligaments. Challenge – get a near-miss streak of eight vehicles.
Lexington
Signature ability – Air Boost: now you’re flying with nitrous! Challenge – 360 spin three times.
MDI-344T (Tank)
Unlock conditions – complete the mission ‘Severance Package’. No signature abilities or challenges.
MDI-525C (APC)
Signature ability – Crab Steering: makes parallel parking and changing lanes a breeze. Challenge – sideswipe eight enemy vehicles.
MDI-707B (Hoverbike)
Unlock conditions – complete the mission ‘Corporate Retreat’. No signature abilities or challenges.
Mockingbird
Signature ability – Ejector Seats: perfect for thrill seekers and spies. Challenge – car to wingsuit once.
Munchback
Signature ability – Crab Steering: makes parallel parking and changing lanes a breeze. Challenge – sideswipe eight enemy vehicles.
Mule
Signature ability – Ball & Chain: leave destruction in your wake. Challenge – 100 towing payload smashes.
Olive
Signature ability – Ejector Seats: perfect for thrill seekers and spies. Challenge – car to wingsuit once.
Palanquin
Location – complete the mission ‘The Rod Warrior’. Signature ability – Infinite Boost: a full nitrous burn instantly refills nitrous. Avoid collisions to sustain boost. Challenge – perform three Nitrous boosts.
Peacemaker
Signature ability – Kneecappers: shreds tires and ligaments. Challenge – get a near-miss streak of eight vehicles
Peterliner
Signature ability – Infinite Boost: a full nitrous burn instantly refills nitrous. Avoid collisions to sustain boost. Challenge – perform three Nitrous boosts.
Phoenix
Signature ability – Ball & Chain: leave destruction in your wake. Challenge – 100 towing payload smashes.
Porter
Signature ability – Super Air Control: more flips, more fun. Challenge – double backflip twice.
Potato
Location – collect all five lost wheels in Badlands South. Signature ability – Super Air Control: more flips, more fun. Challenge – double backflip twice.
Prototype RTP 62-8S (Hoverboard)
Unlock condition – complete the first Eurekatabor! venture mission. No signature abilities or challenges.
Raycaster
Signature ability – Ejector Seats: perfect for thrill seekers and spies. Challenge – car to wingsuit once.
Responder
Signature ability – Infinite Boost: a full nitrous burn instantly refills nitrous. Avoid collisions to sustain boost. Challenge – perform three Nitrous boosts.
Ride
Signature ability – Crab Steering: makes parallel parking and changing lanes a breeze. Challenge – sideswipe eight enemy vehicles.
Ridgelord
Signature ability – Jump: hop and skip over rush-hour traffic. Challenge – barrel roll three times.
Saguaro
Signature ability – Ejector Seats: perfect for thrill seekers and spies. Challenge – car to wingsuit once.
Sandstorm Elite
Signature ability – Super Air Control: more flips, more fun. Challenge – double backflip twice.
Sanicruiser
Signature ability – Super Air Control: more flips, more fun. Challenge – double backflip twice.
Shaft
Signature ability – Ball & Chain: leave destruction in your wake. Challenge – 100 towing payload smashes.
Shield
Signature ability – Air Boost: now you’re flying with nitrous! Challenge – 360 spin three times.
Shifty
Location – near the Swole Hole clothes shop Signature ability – Kneecappers: shreds tires and ligaments. Challenge – get a near-miss streak of eight vehicles.
Skirmish
Signature ability – Crab Steering: makes parallel parking and changing lanes a breeze. Challenge – sideswipe eight enemy vehicles.
Snake
Signature ability – Jump: hop and skip over rush-hour traffic. Challenge – barrel roll three times.
Sojourn
Signature ability – Crab Steering: makes parallel parking and changing lanes a breeze. Challenge – sideswipe eight enemy vehicles.
Titan
Signature ability – Kneecappers: shreds tires and ligaments. Challenge – get a near-miss streak of eight vehicles.
Varsity
Signature ability – Infinite Boost: a full nitrous burn instantly refills nitrous. Avoid collisions to sustain boost. Challenge – perform three Nitrous boosts.
Vigilance
Signature ability – Ball & Chain: leave destruction in your wake. Challenge – 100 towing payload smashes.
Vindicator
Location – collect all five lost wheel parts in Badlands North. Signature ability – Infinite Boost: a full nitrous burn instantly refills nitrous. Avoid collisions to sustain boost. Challenge – perform three Nitrous boosts.
Whip
Signature ability – Ball & Chain: leave destruction in your wake. Challenge – 100 towing payload smashes.
Widowmaker
Location – collect all five Bandaged car parts in lost wheels Signature ability – Air Boost: now you’re flying with nitrous! Challenge – 360 spin three times.
Boats
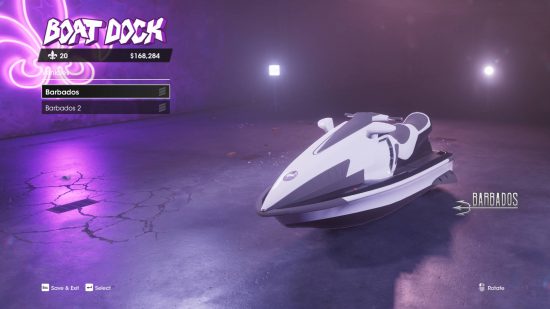
Barbados
Unlocks with the dock. No abilities.
Maelstrom
No abilities.
Malta
No abilities.
Minnow
Doesn’t store in the boathouse. No abilities.
Aircraft
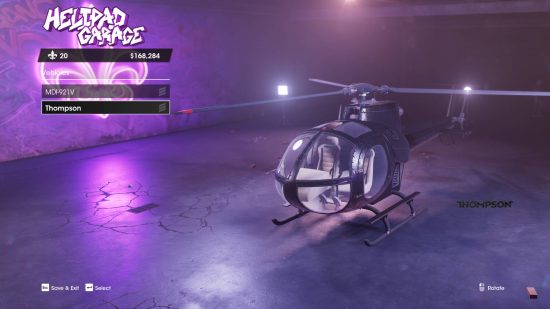
Thompson
Unlocks with the helipad. No abilities.
Oppressor
Unlock conditions – complete the Planet Saints side missions. No abilities.
Tornado
Unlock conditions – complete Best Friends Forever mission. No abilities.
MDI-921V
Unlock conditions – complete the mission ‘Showdown’. No abilities.
Those are all of the Saints Row vehicles. Now that you have access to the best car for the job, why not call on a friend to take on missions as part of your crew in Saints Row multiplayer? We also have a Saints Row guide for beginners if you’re new to the series that should get you up to speed and the best Saints Row perks and skills you should equip before your next heist.