Best Mw3 Loadouts For The Current Meta
With Modern Warfare 3 Season 6 here, it’s likely that you’ve been playing for a while and already have your favorite MW3 guns picked out. The meta changes quickly, and if you don’t keep up, you’ll be left in the dust. Whether you opt for a mobile SMG class or prefer to eliminate your opponents from range with powerful assault rifles, we have the best MW3 loadouts here.
Best Modern Warfare 3 loadouts
Here are the best loadouts in MW3, including the optimal equipment and perks:
DTIR 30-06 and Renetti Kastov LSW and Static-HV RPK and FJX Horus Static-HV and STG 44 Superi 46 and SVA 545 Kar98k and Renetti SOA Subverter and Renetti BP50 and Renetti BAS-B and Cor-45 XRK Stalker and Cor-45 MCW and Renetti DG-58 and Tyr MTZ 556 and Renetti SVA 545 and Cor-45 Rival 9 and Cor-45 Striker and Renetti
DTIR 30-06
A hard-hitting battle rifle with almost no recoil, the DTIR has an incredibly fast TTK, and while it doesn’t have the most maneuverability, patient players will find a lot of success with our loadout. Our best DTIR 30-6 loadout goes into depth for those who wish to take this meta weapon into multiplayer.
Attachments
Muzzle: Monolithic Suppressor Barrel: EXTND-10 Long Barrel Optic: Corio Eagleseye 2.5x Stock: Rifleman 200 Magazine: 40 Round Mag
Equipment and Perks
Vest: Overkill Vest Lethal: Sticky Grenade Tactical: Smoke Grenade Field Upgrade: Munitions Box Perks: Scavenger Gloves, Lightweight Boots, Mag Holster
Kastov LSW
The first LMG designed for close-quarters combat, the Kastov LSW is a perfect fit for frantic multiplayer matches. Your mobility will be slower than that of an SMG, but the deep magazine and fast rate of fire should see you mowing down entire teams with our best Kastov LSW loadout. The Glassless Optic gives a clear sight picture and should enable you to react to any advancing enemies, although you’d still best holding down areas rather than pushing them.
Attachments
Muzzle: Quartermaster Suppressor Barrel: Mitigator X40 Heavy Barrel Optic: JAK Glassless Stock: Spetsnaz S15 Underbarrel: Bruen Heavy Support Grip
Equipment and Perks
Vest: Overkill Vest Lethal: Sticky Grenade Tactical: Smoke Grenade Field Upgrade: Munitions Box Perks: Scavenger Gloves, Lightweight Boots, Mag Holster
RPK
For the RPK, it is recommended that you add the JAK Cataclysm conversion kit, as we mention in our full best RPK loadout guide, which can be unlocked via weekly challenges. This makes the LMG more clunky but drastically increases damage and damage range, almost turning it into a super-powerful sniper rifle. Add a decent laser, optic, or both, and pair it with a lightweight SMG like the FJZ Horus below, and you’ve got the perfect loadout for every distance.
Attachments
Muzzle: Quartermaster Suppressor Stock: EXO-TAC Rear Grip: DEMO-X2 Grip Underbarrel: Paracord Grip Conversion Kit: JAK Cataclysm
Equipment and Perks
Vest: Overkill Vest Lethal: Sticky Grenade Tactical: Smoke Grenade Field Upgrade: Munitions Box Perks: Scavenger Gloves, Lightweight Boots, Mag Holster
FJX Horus
This is a pretty simple build, simply making this beast of an SMG more accurate while padding out your mag, and taking advantage of those powerful hits. With some precise chest or headshots, you can take on a good four opponents without having to reload, which could be the difference between life and death.
Attachments
Barrel: SUPE-SIL Suppressed Barrel Laser: Schlager ULO-66 Laser Stock: SL TAC Hive V.4 Stock Rear Grip: THAR-V1.2 Grip Underbarrel: Paracord Grip
Equipment and Perks
Vest: Overkill Vest Lethal: Sticky Grenade Tactical: Smoke Grenade Field Upgrade: Munitions Box Perks: Scavenger Gloves, Lightweight Boots, Mag Holster
Static-HV
The Static-HV’s high rate of fire and deep ammo reserves make it perfect for aggressive players. When combined with our best Static-HV loadout, your hip-fire and TAC stance will be almost as accurate as aiming down sights. Push the pace and rack up as many kills as you can.
Attachments
Barrel: SUPE-SIL Suppressed Barrel Laser: Schlager ULO-66 Laser Stock: SL TAC Hive V.4 Stock Rear Grip: THAR-V1.2 Grip Underbarrel: Paracord Grip
Equipment and Perks
Vest: Gunner Vest Lethal: Throwing Knife Tactical: Flash Grenade Field Upgrade: Munitions Box Perks: Quick-Grip Gloves, Mag Holster
Superi 46
The Superi 46 is fairly versatile as far as SMGs go, but we’ve settled on a close-range build thanks to its impressive mobility. Depending on your play style, you may need to think carefully about what secondary weapon you pick when dropping into medium-sized maps. We’ve also got a more all-round setup in our best Superi 46 loadout for you to try if this doesn’t quite suit your playstyle.
Attachments
Barrel: Terminal V Suppressed Barrel Underbarrel: XRK Edge 8W-4 Handstop Magazine: 40-Round Mag Rear Grip: XTEN Grip Stock: Rescue-9 Stock
Equipment and Perks
Vest: Gunner Vest Lethal: Throwing Knife Tactical: Flash Grenade Field Upgrade: Munitions Box Perks: Quick-Grip Gloves, Mag Holster
Kar98k
Our Kar98k loadout ensures you’re able to kill opponents in one shot while making massive improvements to the weapon’s ADS speed. The optic can be changed based on personal preference, but we think that the Corio Eagleseye offers adequate magnification and an exceptionally clean sight picture. Having a Renetti in your back pocket gives you some insurance should an enemy push your position aggressively. Alternatively, you could go for our Kar98k Warzone loadout, focusing more on a long-distance approach when playing on larger maps.
Attachments
Barrel: Bryson Carbine-S Barrel Optic: Corio Eagleseye 2.5x Stock: Repeller TAC Stock Slings: Target Sling Ammunition: 7.92 High grain Rounds
Equipment and Perks
Vest: Gunner Vest Lethal: Semtex Tactical: Flash Grenade Field Upgrade: Munitions Box Perks: Quick-Grip Gloves, Mission Control headset
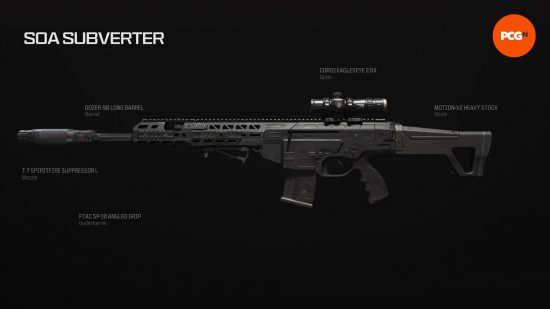
SOA Subverter
Our loadout takes the powerful battle rifle and transforms it into a devastating DMR. With little to no recoil and an extremely fast TTK, the SOA Subverter can dominate entire squads, even with its relatively small magazine size. Check out our SOA Subverter loadout here for the full run-down, and get yourself some easy wins.
Attachments
Muzzle: T-7 Spiritfire Suppressor L Barrel: Dozer-90 Long Barrel Optic: Corio Eagleseye 2.5x Stock: Motion-V2 Heavy Stock Underbarrel: FTAC SP-10 Angled Grip
Equipment and Perks
Vest: Gunner Vest Lethal: Semtex Tactical: Flash Grenade Field Upgrade: Munitions Box Perks: Quick-Grip Gloves, Mission Control headset
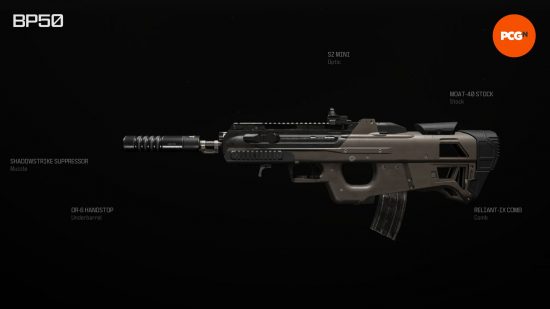
BP50
The BP50 returned to Call of Duty in the Modern Warfare 3 battle pass for Season 2. Even just with its base kit, this incredibly accurate assault rifle has minimal recoil, all you need is an optic and you’re ready to go. Of course, you’ll get better results using the best BP50 loadout for close to mid-range combat. If you’re lucky (or rather skilled) enough to have unlocked the CP50 JAK Revenger conversion kit, we recommend that even more highly for the current meta, but we’re not including it below for the sake of those who don’t have it.
Attachments
Muzzle: Shadowstrike Suppressor Underbarrel: DR-6 Handstop Optic: SZ Mini Stock: Moat-40 Stock Rear Grip: TRST-IV Grip Tape
Equipment and Perks
Vest: Gunner Vest Lethal: Semtex Tactical: Flash Grenade Field Upgrade: Munitions Box Perks: Quick-Grip Gloves, Mission Control headset
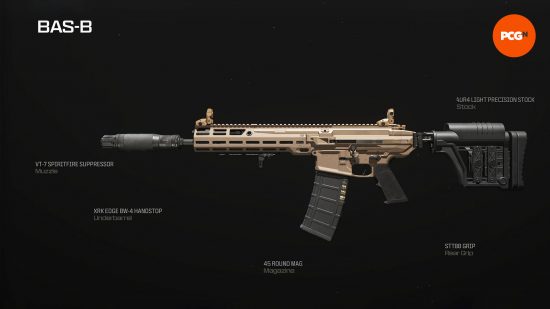
BAS-B
A mid-range monster in Warzone, and, it turns out, a force to be reckoned with in multiplayer too. The BAS-B has immense damage, a decent fire rate, and very controllable recoil; you’ll be able to take down entire teams with a single clip as long as your positioning is right, which is what makes the BAS-B one of the most powerful weapons in MW3 right now.
Attachments
Muzzle: T-7 Spiritfire Suppressor L Underbarrel: XRK Edge BW-4 Handstop Stock: Bruen LAUR4 Light Precision Stock Rear Grip: ST88-Grip Magazine: 45-Round Mag
Equipment and Perks
Lethal: Frag Grenade Tactical: Flash Grenade Field Upgrade: Munitions Box Vest: Engineer Vest Gloves: Quick-Grip Gloves Boots: Stalker Boots Gear: Mission Control Comlink, Trophy System
Keep yourself topped up with ammunition with your Munitions Box, and pour it on your enemies, racking up quick killstreaks with the Mission Control Comlink. Quick-Grip Gloves allow you to swap weapons instantly if you run out of ammo mid-fight; it’s always good to have a plan B, even if your plan A is so potent.
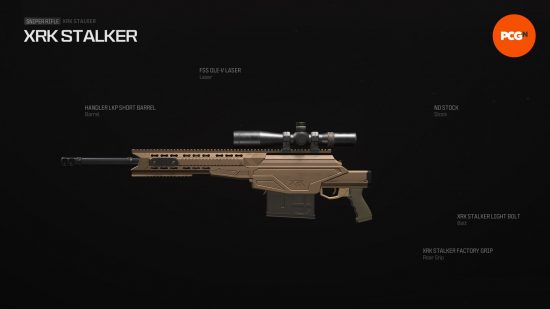
XRK Stalker
With the Season 1 battle pass came the XRK Stalker, and with these attachments, you can bring back the glory days of quick scoping. The XRK Stalker is a force to be reckoned with once you get the rhythm of your shots down.
Attachments
Barrel: Handler LKP Short Barrel Laser: FSS OLE-V Laser Stock: No Stock Bolt: XRK Stalker Light Bolt Rear Grip: XRK Stalker Factory Grip
Equipment and Perks
Lethal: Frag Grenade Tactical: Stun Grenade Field Upgrade: Trophy System Vest: Demolition Vest Gloves: Quick-Grip Gloves Climbing Boots: Climbing Boots Gear: Mission Control Comlink
Set up your zone of destruction, utilizing the Trophy System to ensure you don’t get poked from range with explosives. The Mission Control Comlink should keep you in killstreaks, with the Quick-Grip Gloves available to switch to your secondary if things get a little hairy.
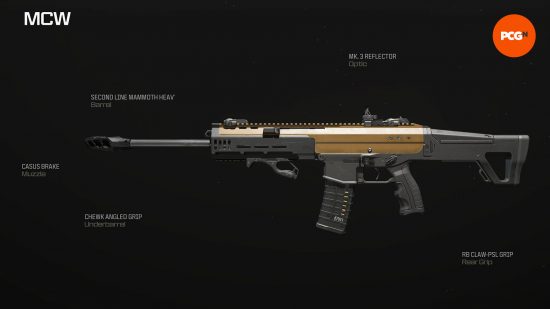
MCW
The MCW is a hard-hitting assault rifle, capable of taking out opponents at mid-long range. With our best MW3 MCW loadout, we nail down that recoil to ensure your shots always stay on target.
Attachments
Muzzle: Casus Brake Optic: MK.23 Reflector Rear Grip: RB Talon-X3 Grip Barrel: Second Line Mammoth Heavy Underbarrel: Chewk Angled Grip
Equipment and Perks
Lethal: Frag Grenade Tactical: Flash Grenade Field Upgrade: Munitions Box Perks: Quick-Grip Gloves, Stalker Boots, EOD Padding, Bone Conduction Headset
Make your opponents think twice about pushing you with the flash and frag grenades, and always stay stocked up on ammunition with the Munitions Box. The Bone Conduction Headset will enable you to hear an approaching enemy much clearer, and the Quick-Grip Gloves can be vital in swapping to your Renetti for those close-range encounters.
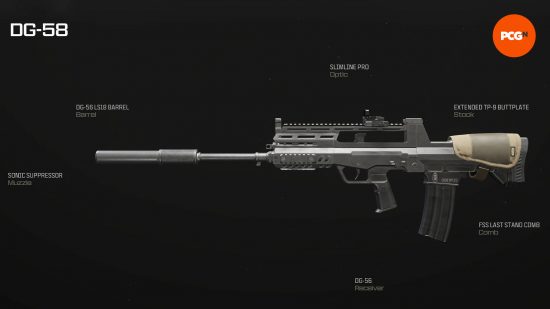
DG-58
The DG-58 is arguably the best assault rifle in MW3 right now thanks to its incredible damage output with a single burst of fire. By default, the DG-58 fires in bursts of three, meaning if you point directly at an enemy’s head using our loadout, they will fall to the ground after just one click.
Attachments
Muzzle: Sonic Suppressor Optic: Slimline Pro Rear Grip: Extended TP-9 Buttplate Barrel: DG-56 LS18 Barrel Comb: FSS Last Stand Comb
Equipment and Perks
Lethal: Frag Grenade Tactical: Stun Grenade Field Upgrade: Trophy System Vest: Demolition Vest Gloves: Quick-Grip Gloves Climbing Boots: Climbing Boots Gear: Mission Control Comlink
What makes this loadout so deadly is the demolition vest which supplies you with two lethal grenades. Even if you blindly throw a frag grenade in the direction of an enemy squad, you’re almost certainly going to get a kill. Pair these explosives with the Mission Control Comlink to reduce the number of kills needed for killstreaks. We’ve also equipped the Trophy System to stop any incoming grenades from spoiling your fun if you find yourself holed up somewhere for protection.
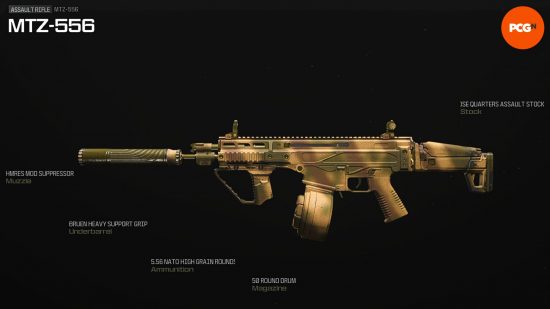
MTZ 556
The MTZ 556 is a superb all-around assault rifle, with decent movement speed and finds success in mid-range skirmishes. Our best MW3 MTZ 556 loadout reduces the gun kick and extends the AR’s range, so you’ll always come out on top.
Attachments
Muzzle: HMRES Mod Suppressor Underbarrel: Bruen Heavy Support Grip Ammunition: 5.56 NATO High Grain Magazine: 50-Round Drum Stock: RB Crotalus Assault Stock
Equipment and Perks
Lethal: Frag Grenade Tactical: Flash Grenade Field Upgrade: Munitions Box Perks: Quick-Grip Gloves, Stalker Boots, EOD Padding, Bone Conduction Headset
With frag and flash grenades at your disposal, you can keep enemies at arms reach, and a munitions box will ensure you never run out of ammunition. Keep a keen ear out for pushing enemies with the Bone Conduction Headset – your EOD Padding should keep you safe against incoming grenades, and utilize the Quick-Grip Gloves to switch to your secondary in the blink of an eye.
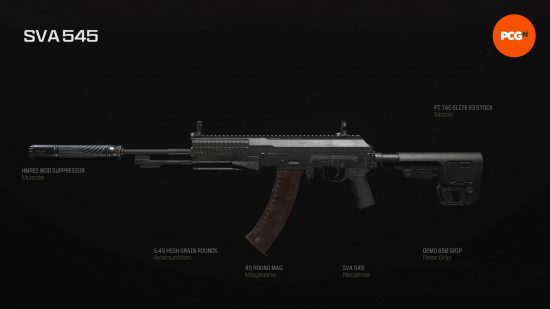
SVA 545
The SVA 545 has incredible burst potential, with the first two rounds of your trigger pull firing almost simultaneously. We take this instant damage and push it even further with our best MW3 SVA 545 loadout, extending the range of the assault rifle, and adding a suppressor so you’ll always be off the minimap.
Attachments
Muzzle: HMRES Mod Suppressor Stock: FT TAC-Elite Stock Ammunition: 5.45 High Grain Rear Grip: Demo-X2 Grip Magazine: 45-Round Mag
Equipment and Perks
Lethal: Frag Grenade Tactical: Flash Grenade Field Upgrade: Munitions Box Perks: Quick-Grip Gloves, Stalker Boots, EOD Padding, Bone Conduction Headset
With the Quick-Grip gloves, you can swap to your secondary instantly if your enemies get too close for comfort. If they do crowd your space, utilize the Bone Conduction Headset to pinpoint exactly where they are, and push through their explosives with the EOD Padding.
Rival 9
The Rival 9 is an SMG that, out of the box, lacks a decent amount of range, so our best MW3 Rival 9 loadout looks to extend the effective damage range of the gun so you can take on more fights.
Attachments
Muzzle: Monolithic Suppressor Underbarrel: XRK Edge BW-4 Handstop Stock: Bruen Flash V4 Stock Rear Grip: Rival Vice Assault Grip Magazine: 50-Round Drum
Equipment and Perks
Lethal: Semtex Tactical: Flash Grenade Field Upgrade: Munitions Box Perks: Scavenger Gloves, Lightweight Boots, EOD Padding, Bone Conduction Headset
Utilize your flash grenades before entering a tight area, and stick anything that moves with your Semtex. Your Scavenger Gloves and Lightweight boots mean that you can stay hypermobile, and never run out of ammunition. If you are running low, with nobody to scavenge from, drop a Munitions Box, and you’ll be good to go.
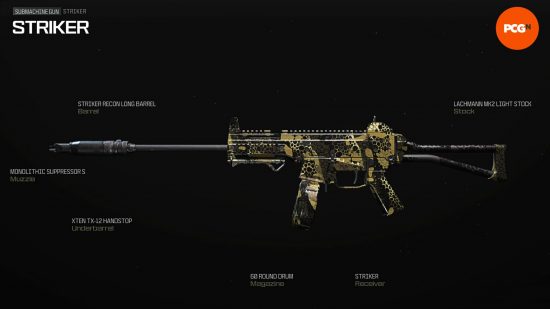
Striker
If you value mobility over sheer firepower, then the Striker SMG is ideal. With our best MW3 Striker loadout you’ll have increased movement, strafe, and ADS speed, so you can run circles around your enemies.
Attachments
Muzzle: Monolithic Suppressor Barrel: Striker Recon Long Barrel Stock: Lachmann Mk2 Light Stock Underbarrel: XTEN TX-12 Handstop Magazine: 60-Round Drum
Equipment and Perks
Lethal: Semtex Tactical: Flash Grenade Field Upgrade: Munitions Box Perks: Scavenger Gloves, Lightweight Boots, EOD Padding, Bone Conduction Headset
Running Semtex will help you stick players at close range, and flashing a room before you enter is always a good habit to get into. Your Bone Conduction Headset allows you to pinpoint enemy footsteps with greater accuracy, so you can go on the hunt, utilizing your Scavenger Gloves to stay stocked up with ammunition at all times.
Renetti
With the MW3 aftermarket parts conversion kit, the Renetti is transformed from a run-of-the-mill handgun to a powerful SMG. The best Renetti loadout is the perfect pairing for one of the heavier assault rifles on the list, or as a primary, if you want the maximum amount of movement speed possible.
Attachments
Aftermarket Parts: Jak Ferocity Carbine Kit Muzzle: Monolithic Suppressor Optic: Slate Reflector Ammunition: High Grain Magazine: 50-Round Drum
Equipment and Perks
Lethal: Semtex Tactical: Flash Grenade Field Upgrade: Munitions Box Perks: Quick-Grip Gloves, Lightweight Boots, EOD Padding, Bone Conduction Headset
Get in and out quickly with battle rage, and tag people with your Semtex at close range to secure some easy kills. You’ll mainly find that the Renetti performs best as a secondary, so equipping Quick-Grip Gloves can be a lifesaver when you have to switch out instantly.
Those are the best loadouts in MW3 right now, so give yourself the best chance at taking home the win by equipping the one that best matches your playstyle. You may find that what works in one of the MW3 maps or MW3 game modes doesn’t work in another, so experiment and find out what works for you.